Categories
Vegetable Gardening

How to do Worm Farming for Vegetable Garden?

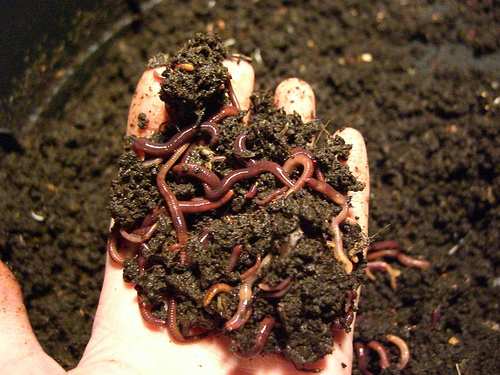
Introduction

Technically, worm farming is called as vermiculture or vermicomposting. It is a tremendous way to minimize food waste generated in your kitchen. This kitchen waste, which is organic in nature, is the source of food for the worms present in the soil. The organic waste is used by the worms as food. They decompose it into nutrient rich material. As this decomposing is carried out in the soil, the nutritious material made by the worms is readily available for the plant growth in your vegetable garden.

How Worm Farming is Beneficial?

Worm farming or Vermicompost plays a vital role in improving soil texture, structure and aeration. It also adds strength to the soil in terms of increasing water-holding capacity of the soil. The vegetables you grow will develop a deep and strong root system that is beneficial to fight diseases and sustain under harsh conditions.

The output of worms which is also called as wormpoop or worm castings is perfect to generate top soil in vegetable gardening. On the other hand, the fluid produced in the process of vermicomposting is used as fertilizer. The excess fluid can be stored in a bottle for later use.  Similarly, vermicomposting also adds valuable microorganisms to the soil. The advantage of these microorganisms is that they, along with the soil fauna, aid in breaking organic materials and convert nutrients into a more readily available food form for the plants

Another benefit of worm farming is that, you can use your organic kitchen waste in vermiculture instead of going to throw or landfill it.

Continue to Next Page

Categories
Vegetable Gardening

How to Grow Cucumber in Your Vegetable Garden?

Introduction

Sorry for a long gap. I was busy in cleaning up my vegetable garden and preparing it for winters. My preference for winter is to cultivate underground veggies like Turnip, Radish, Garlic, Sugar Beet and Beet Root. I have prepared the raised beds now with added compost. However, keeping in view the vegetable gardening calendar, there is plenty of time left in winters for my Cucumbers to give me some more organic and fresh fruits. I have been growing Cucumber for the last 7 years and believe me they are so easy to grow and require less care. So today, I am going to write on how to grow Cucumbers in your vegetable garden?

Cucumber in Vegetable Garden

Without Cucumber, I feel my kitchen garden empty. Usually, I use my own seeds, saved from last year harvest. An advantage of having Cucumber in vegetable garden is that, they occupy less ground and vines can be propagated in any way you want. Vegetable garden looks greenish and soothing to eyes and its fruit gives you a fine style of health and happiness with a condition that you are using compost not the synthetic fertilizer. A Cucumber plant adds yellow flowers and curling tendrils to your vegetable garden.

Climatic and Soil Condition Required for Cucumbers

There are two types of Cucumber; the Bush Cucumbers and Vining Cucumber. I prefer Vining ones for vegetable gardens because of the foliage and less ground occupation plus the growth is fast and fruits are abundant than Bush variety.

Cucumber is usually warm season vegetable and thrives well when ground temperature is around 60 to 70 F. The soil pH should be around 7. A fertile soil is the chief demand by a Cucumber plant. Use compost for adding desired nutrients. You may also use aged manure for this purpose.

Sowing the Cucumber

For vegetable garden sowing, plant the seeds 1 inch deep in soil. The distance for Bush variety should be 30-60 inches and at least 1 foot distance should be maintained in case of Vine Cucumbers. For transplants, they should be sown 2 inches deep while distance should be same as mentioned earlier

Soil Condition

The soil requirement is moist and well drainage should be characteristic of the soil. Soggy soil is the enemy of your Cucumber plant. A soil, mixed with compost results in healthy and fast growth in vegetable garden.

Managing the Vines

A trellis is the best option for allowing the vines to climb especially when the space is an issue. Trellising is preferred to safeguard the fruit from damage from lying on the damp ground.

Continue to Next Page

Categories
Vegetable Gardening

How to Grow Lettuce Leaves in a Container?

Introduction

Today, I am going to share my experience of how to grow lettuce in a container placed anywhere in your kitchen or vegetable garden. Lettuce is a kind of vegetable that can be grown all-round the year in any climatic conditions. On top of it, its nutritious value is high and is best suited food ingredient for people who are on a diet. Low in saturated fats and sodium, lettuce is rich in;

  • Thiamin
  • Iron
  • Vitamin B6
  • Potassium

In addition to this, it is a good supplier of;

  • Dietary Fiber
  • Folate
  • Manganese
  • Vitamin A
  • Vitamin C
  • Vitamin K

Vegetable Gardening for Beginners: a Complete Guide

Lettuce in Urban Gardening Containers

Urban gardening is gaining popularity these days as it can add a joyous activity in your daily busy and hectic life. On the other hand, it also adds fresh and juicy vegetables for your meals and a healthy life style.

Lettuce

Salads are a vital part of our food, offering lots of valuable vitamins with least calories, thus ideal food for diet conscious people. For this purpose, lettuce are easy to grow in container of your vegetable garden that will return you with multiple harvests. Growing lettuce in kitchen garden can be an amazing experience for the beginners.

Below lines will guide you with the steps of how to grow lettuce in a container of your kitchen garden.

What do you Need?

Lettuce plant allows you multiple harvests, i.e. as you collect the leaves, new ones grow in place of older. For this reason, it is very important to have;

  • Proper quality potting soil
  • Good quality seeds.
  • Right size container

Recommended Container & Potting Soil for Growing Lettuce

Soil: First step in how to grow lettuce is the selection of proper soil. Good quality potting soil is available in the near nursery store while many online stores also offer potting soils for lettuce. Just be sure that potting soil for lettuce should have a mix of soil, peat or compost and vermiculite or perlite. This soil mix allows good water retention that is best suited for lettuce in containers.

Seeds: There are various varieties available for growing lettuce in a container. In fact when you search for a variety of lettuce, you will be amazed that there are endless varieties of lettuce available. My recommendation is to select the variety you like the most. This is because, different varieties taste differently. Among many, you can chose;

  • Crisphead
  • Butterhead
  • Lose leaf
  • Summer Crisp
  • Little Gem
Lettuce Varieties for Container Farming

What I have grown in container of my vegetable garden is Little Gem variety. This variety was originated in France. You will find this variety crunchy, sweet in taste with miniature heads of lettuce that are full of nooks and crannies.  Little Gem variety of lettuce is best for salad dressing and can be cooked for food.

Container: The container should have an appropriate size with drainage holes. My container size is 12 inch and it has already given me 3 harvests and still lettuce plants are performing well. The container should have appropriate size because as the lettuce plant grows the root system also expands.

Growing Lettuce in a Container

Sowing the Lettuce

Now you have reached the most important phase of growing lettuce in container. Choose the place that has good access to sunlight. Lettuce loves sunlight. Its large green leaves love to do photosynthesis a lot. So it is highly recommended to move the container into a brighter space with at least 8 hours sunlight access.

Now moving to the sowing phase, fill your container with potting soil up to an inch or even two centimeters below the rim. For direct sowing, place the seed 1/4 to 1/2 half inch deep and then cover with soil. The soil should be moistened.

It is recommended to sow your seeds 4 to 6 inches apart. on the contrary, I have sown my Little Gem lettuce seeds 3 inch apart and I am getting good produce of lettuce in container. However, if you are planning to cultivate Lose Leaf variety of lettuce, 4-6 inch distance is a must. Remember that the seedbed of your lettuce in container never dry out.

Sowing Lettuce Seeds

Caring the Growing Lettuce in Container

Now you have passed the important steps of growing lettuce in a container. Wait for germination. Usually it takes 5 to 10 days for germinating. Your newly born tiny lettuce plants need your care. Following are few points that should be taken care of while growing lettuce in a container.

  • Never add synthetic fertilizer to your lettuce in container of urban garden. The objective of having fresh and organic vegetable garden grown lettuce will die at the moment you add a pinch of fertilizer. So avoid it. The potting soil is already rich in nutrients.
  • Add compost ‘if’ needed.

Prepare Your Compost at Home. How? Here is my DIY Article on Making Compost at Home

  • If temperature is around your kitchen garden is more than 30oC, move your container to a shady place. This is the biggest advantage of growing lettuce in a container to customize it in any manner you need.
  • Avoid drying of soil in your lettuce container.

Believe me, the result of all the previous steps and caring you will add to the growing lettuce in container will result in lush green and healthy lettuce leaves. They will be ready to cut right after six weeks after sowing. You can harvest them with a sharp knife but try to harvest little, just the amount you needed.

Germinating Lettuce

 Hey Guys, don’t forget to like and share this post below. It will be a boost-up for me.

Happy Growing and Eating 🙂

Cite this Article in APA Style as:

[box type=”note” align=”aligncenter” ]Rahman, M. A. (2017, September 16). How to Grow Lettuce Leaves In a Container? [Blog Post]. Retrieved from http://aridagriculture.com/2017/09/16/how-to-grow-lettuce-leaves-in-a-container[/box]

Save

Save

Save

Save

Save

Save

Save

Save

Save

Save

Categories
Vegetable Gardening

Vegetable Seed Sowing Planners for Northern and Southern Hemisphere

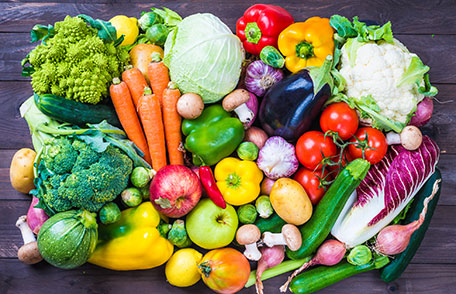
Introduction

Vegetable growing in your kitchen garden is fun. Best time is when you harvest your crop. You feel satisfaction while providing healthy and nutritious meals to your family at the dining table. However, to get optimum output from the limited space in urban gardens, time of sowing vegetable seed is of utmost importance. One of the biggest issues faced by the vegetable gardeners is the lack of access to the knowledge bank regarding perfect time of vegetable seed sowing. Sowing time is critical and window is narrow. So it is important to have a vegetable seed sowing planner with every kitchen gardener in his gardening kit so that the dates never miss.

Select you Region

The globe is divided into two parts; the Northern and hemisphere and Southern Hemisphere. Further, these hemispheres are divided into three parts.

  • Cold Region
  • Tropical/Sub-tropical Region
  • Temperate Region

Now the time of sowing seeds in these regions of two hemispheres is entirely different and in some cases opposite to one another. Most of the gardening websites on the internet just provide guides on how to grow vegetables. Even some mention the months of sowing and harvesting. But the thing is, September may be perfect to grow Asparagus in Tropical/Sub-tropical regions of Southern Hemisphere but it is not good time to sow seeds of Asparagus in Tropical/Sub-tropical regions of Northern Hemisphere. The climate is different in two hemispheres and so is the growing season.

This article is going to provide an access to my readers with the 25 top and easy to grow vegetables in vegetable garden of their urban gardening system in one article. The time period to harvest each vegetable is also mentioned against each vegetable in the planner so that you can adjust your vegetable growing calendar accordingly.

Defining Cold, Tropical/Sub-tropical and Temperate Regions

Cold Region:The word Cold varies a lot among various countries. However, a Cold Region is characterized by freezing temperatures during winter. These regions have very short vegetative period.

Tropical/Sub-tropical Region:In tropical, temperature is high throughout the year and there is a marked ‘rainy’ and ‘dry’ season. In sub-tropical areas, weather has varied pattern. Winter is cooler somehow but frost and snow is rare and only occurs in mountainous areas.

Temperate Region:Temperate season also vary a lot among areas. However, the summer temperature is higher than other seasons but there is no snow during winter. Frost may occur during winter.

Few Advises before Growing Veggies in Urban Garden

Advantages of Growing Vegetables from Seeds

Before heading towards the planner, I know some are thinking why don’t we simply go to the nursery and buy vegetable transplants to grow vegetables in kitchen garden? To answer this, I have four reasons.

  1. Growing vegetables from seed allows you to grow number of varieties in limited space of your urban garden
  2. Seeds are cheaper than transplants.
  3. Growing vegetable from seed allows you to have confidence on the quality of vegetable you are growing.
  4. Level of happiness and satisfaction is more in growing vegetables from seeds.

Avoid Application of Fertilizer

If you are growing vegetable from seeds, I will strongly recommend not adding any kid of synthetic fertilizer to boost vegetable plant growth. If you are working hard to grow your own veggies in kitchen garden, then don’t waste your efforts by adding fertilizer. Only use compost. You can buy compost from online stores or make your own compost pile at home using organic wastes.

Sample Download

Vegetable Planner for Temperate Regions of Northern Hemisphere Download

[emaillocker id=”678″]

Vegetable Planner for Temperate Regions of Southern Hemisphere Download

Vegetable Planner for Temperate Regions of Northern Hemisphere Download

Vegetable Planner for Tropical/Sub-tropical Regions of Southern Hemisphere Download

Vegetable Planner for Tropical/Sub-tropical Regions of Northern Hemisphere Download

[/emaillocker]

Cite this article in APA style as:

[box type=”note” align=”aligncenter” ]Rahman, M. A. (2017, September 14). Vegetable Seed Sowing Planners for Northern and Southern Hemisphere [Blog Post]. Retrieved from http://aridagriculture.com/2017/09/14/vegetable-seed-sowing-planners-for-northern-and-southern-hemisphere/[/box]

Save

Save

Categories
Vegetable Gardening

Post-Storm Irma Tips for Kitchen Gardeners

Introduction

I hope my readers and their families are all fine who faced the storm Irma few days back in South and North America. These storms are inevitable in the current global climate change. Even science with today’s level of advancement cannot limit them in boundaries. So we are left with the only option of coping with these storms. Irma has spoiled millions of acres of land, damaging homes, kitchen gardens, parks, landscapes, infrastructures and wealth of people. However, it is the time to rebuild with a new spirit.

As a dirt lover, my concern is the rebuilding of the kitchen gardens that we have at our homes. Being a gardener, I am aware that the high speed winds, floods and salty rain water came with Irma has damaged not only the plants but also the soil. However, if we look at the bright side and think positively, there are few opportunities with the leftovers of Irma that can help us in re-building a prosperous urban garden again in our homes

Here in Pakistan, floods are frequent during the monsoon season (July-September) near the upper Indus Delta. As the flood goes downstream, the land is refilled with fertile soil and minerals that come along with the flood stream. In addition to this, re-shifting of the soil layer also bring positive results on plant health due to added beneficial micro-organisms. But in case of Irma, we have to deal with the water that is added with salts in it. So it is the time to take necessary steps for rebuilding of your urban garden.

First step in re-building of your kitchen garden is the planning to chalk out a pathway. The re-building plan should be categorized into three categories;

  1. Wash down everything
  2. Pruning the leftover plants and cleaning
  3. Recycling or Composting

Wash Down Everything

This is what you should immediately do after a storm. Rinse everything with water in the kitchen garden. This is necessary to remove excess salts came with storm sea water. More the salt stay on the leaves of plants, more it will harm your remaining plants. Even if the storm doesn’t bring sea water, washing everything in your urban garden help removing any harmful and decaying material.

Remove any mud or build of storm from the base of your plants and trees (If they are still left). Mostly trees survive in the storms. However, due to damage on their stem and leaves, there is fair chance that they get infected if you don’t wash them with water after the storm. This will also increase the chance of disease spread in your kitchen garden. Rinsing your plants with water will allow fast pace revival phase.

Some readers may think that adding more water to already saturated soil will damage the roots. But believe me; washing your kitchen garden is much needed after a storm. Removing the mud and other unwanted substances bought with the storm should be done immediately. In addition to this, the water will dilute any contaminants and weaken their power to infect soil and your plants.

Pruning the leftover plants and cleaning

Washing everything in your urban garden will allow you to see a clear picture of what is left in the garden. This will make the next step easy for you. You know what is gone, broken and left over. However, here I recommend waiting a day or two to see any sign of life in your plants. If new branches, leaves or flowers are emerging, give special care to them. Rest of the leaves, branches and stems should be pruned or if damages, they can be removed to allow fresh growth.

Similarly, large trees and shrubs should be given due importance while managing. If they are downed, remove them first. If you have no expertise, consider getting help by calling relevant government agency. This will help you getting security for your family.

Keep in mind to prune gently and less after storm. This is because, plants are already under stress, and pruning them a lot will damage their immunity to regrow. You can further prune in week or two as plant start getting stronger.

Recycling

In the last step of re-rehabilitating your kitchen garden, consider recycling the lost material from your urban garden. How? It is simple; the storms bring not only fertile soil but also rich organic matter. You can prepare your compost pile from the damaged leaves, stems and branches along with the mud came with storm. You can also add some quantity of storm water in your composting bin. The storm water is not drinkable and may contain sewage and industrial waste. This water is fit for accelerating your composting process inside a compost container.

Make Your Own Compost at Home for Urban Gardening. Here are Few Simple Steps

Storm Irma has gone. But that was not the last one. Every country on the globe faces these storms frequently in the changing climate. The need is the better coping and management strategies to minimize loss.

Kitchen garden for a gardener is just like his/her own kid and plants and veggies are darling. Caring them will bring satisfaction and healthy meals to your table.

Be safe, happy growing and eating 🙂

Cite this Article in APA Style as:

[box type=”note” align=”aligncenter” ]Rahman, M. A. (2017, September 12). Post-Storm Irma Tips for Kitchen Gardeners [Blog Post]. Retrieved from http://aridagriculture.com/2017/09/12/post-storm-irma-tips-for-kitchen-gardeners[/box]


Save

Save

Save

Save

Save

Save

Categories
Vegetable Gardening

How to Grow Tomatoes in Container of Your Kitchen Garden?

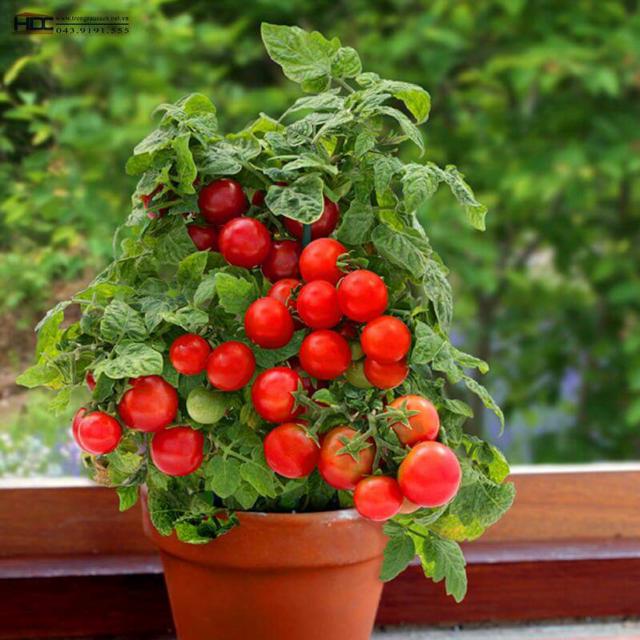
Introduction

Growing tomatoes is always a marathon in my community where our members compete to grow large number of tomatoes in their kitchen garden. To be honest, I have won the competition only once with Cherry Tomatoes variety. Love for growing tomatoes is simple. I am growing number of veggies and tomatoes are just like darling in urban gardening where they need proper attention. So today’s article is going to guide the beginners with the art of how to grow tomatoes in container of kitchen garden.

Growing tomatoes in container is fun. Container gardening is sophisticated where you can customize number of plants you want to grow so that proper attention can be paid. In my opinion, a kitchen garden without tomato plant in there is incomplete. So, whether you have large allotment, or small space like square foot gardening, you should have at least 2-3 plants (depending on the variety) of tomatoes grown.

Growing Tomato in Container. Picture Credit: Balcony Garden Web

In container gardening niche, growing tomatoes has global acceptance. Believe me, tomatoes are the easiest of all to grow. Without any further delay, let me tell you few simple tips to grow tomatoes in container of your kitchen garden.

New to Kitchen Gardening? Read this for Easy Understanding of Managing Your Own Kitchen Garden

1. Selecting the Right Container

First step in how to grow tomatoes in  a container is the selection of an appropriate size of container. Keep in mind that; bigger the container, large will be the root system resultantly, plant will go bigger and bear more fruit. Tomatoes can grow in small containers too in your kitchen garden, but the fruit will be less. The plant I am growing in my home is in a 19’ diameter plastic container.

Plastic containers are best to grow tomatoes in container. Why? The answer is simple, clay or other kind of container is already heavy and after getting soil in it, they get much heavier. In that case, it becomes difficult to move them around. Similarly, in hot and humid climate, clay containers get dry early as compare to plastic container. So my advice is to choose a plastic container for growing tomatoes.

Container for Tomatoes

Next the preparation of your container for growing tomatoes is important. Last year, I did a mistake by putting some pebbles at the bottom of container for good drainage. But at the end of the season, when I tried to use that container soil in my kitchen garden’s raised beds, the soil got mixed with pebbles and I spent a lot time in separating those pebbles from my raised beds. To avoid this, this year, I used plastic window screening at the bottom. It allows good drainage while soil stays put. Urban gardening is all doing new experiments. And yes I do new experiments a lot and recommend my readers to do the same.

What’s the Best Tomato Variety to Grow?

Next challenge in how to grow tomatoes in container is the selection of variety. Not all the varieties are accustomed to perform same in containers as they do in kitchen garden soil. So if you are planning to grow tomatoes in container, select the best variety of tomatoes that perform well in containers. My recommendation is to select the Hybrid Indeterminate verities for container gardening. The reason is early maturing, disease tolerance and 100’s of fruits. The varieties like Sun Sugar, Carmello, Sweet Baby Girl Tomato, Sweet 100 Tomato and Sun Gold give optimum results in container.

Container Varieties of Tomato

For all these varieties, your container should be 12-16” deep. In addition to this, if you are not familiar with these varieties, visit your nearest nursery, online seed store or websites that sell tomatoes for urban gardening in containers. The nursery guy will surely have expertise. Try to harness from his experience or if you are buying online, they have given good description of each variety and clearly mention if the variety is suitable for container gardening.  

Killing Weeds in Your Garden was Never so Easy. Read the Home Remedies Here

Steps in How to Grow Tomatoes in a Container

Choosing Premium Potting Soil

It is quite easy to get good potting soil. Premium quality potting soil is available with nurseries and online stores that is fit to grow tomatoes in container of your kitchen garden. My recommendation is to never use garden soil. It is infested with weeds, fungi and other unwanted material that will affect the health of tomato plant in container. There are various standards of potting soil available for container gardening viz., standard, premium and commercial mixes. Optimum potting mixes have compost, peat moss, perlite, sand and vermiculite in it. Another quality of good mix is that it does not get soggy but holds moisture. Lastly, you can add egg shells to your potting soil to enhance its performance.

Potting Soil

Plants the Tomato Deeply

While panting the tomato plant in container of your kitchen garden, make sure you plant it deeply. The reason is simple. Deeper the plant, the better will be the root system and more fruit will be achieved on each branch. In urban gardening of tomatoes, a simple rule is to plant the tomato at least 6-8 inch deep, so that it has good access to moisture and nutrients.

Planting Tomatoes in Container

Supporting and Protection

Support is needed to grow tomato in container. It is good to insert a support immediately at the time of planting tomato in container of your kitchen garden. This is to avoid any root damage at later stage of giving support. Also, providing the support while planting the tomato in container will help the plant to get accustomed with the support and will grow optimally.

Protecting and Supporting Tomatoes

Growing tomatoes in container is sometime risky in case if you have frequent visitors like squirrels, birds, critters and chipmunks in your kitchen garden. They can feast on your tomatoes while you are sleeping or away from home. To avoid this, use net around the mouth diameter of your container containing tomato plant. My recommendation is to place this protection at the time of planting. This will additionally help the plant in terms of early support.

Supply Consistent Amount of Water

Next in how to grow tomatoes in a container is the supply of consistent amount of water. Tomatoes are water lovers. Water, water and water your tomatoes in kitchen garden. Keeping the soil moist is the secret of success to grow tomatoes in container. To judge when your tomato in container needs water, simply do a finger test. If the top inch of soil in container is dry, it is time to supply water. In case of knee high tomato plant in container, daily water supply is needed especially during summers. In container gardening, timely watering is critical.

Water, Water & Water Your Tomatoes

Refueling the Soil with Compost

As you see that your tomato plant is growing at a good pace in container, it means it has a good supply of nutrients in the soil. However, from the other side, it is a sign that the soil is exhausting in terms of nutrients. Never wait to refuel your potting soil till you see signs of deficiency in your growing or fruiting tomato plant. Use the compost of your kitchen garden regularly to refuel the nutrients in soil. Growing tomatoes need constant supply of these.

Prepare Compost for Kitchen Garden at Home

Making Your Own Compost at Home is Very Easy

Let’s the Sunlight Blush Your Tomatoes

Last vital thing to keep in mind in how to grow tomatoes is the optimum level of sunlight exposure to your tomato plants. Tomatoes love sunlight. Sunlight catalyzes the growth of tomatoes in urban gardening. Your tomato plant needs at least 6 hours of sunlight for proper functioning. In case of container gardening, you can control the time of exposure of your tomato plant to sunlight by adjusting its position. My tomato plant in kitchen garden has an access of 7-8 hours sunlight. So, while planning to grow tomatoes in container, sunlight factor should be in mind.

Tomatoes Love Sunlight

Urban gardening is fun. It is best to grow those vegetables in your kitchen garden that are easy to handle. Plus this will add taste and health to your meals.

Happy growing and eating 🙂

Cite this Article in APA Style as;

[box type=”note” align=”aligncenter” ]Rahman, M. A. (2017, September 08). How to Grow Tomatoes in Container of Your Kitchen Garden? [Blog Post]. Retrieved from http://aridagriculture.com/2017/09/08/how-to-grow-tomatoes-in-container-of-your-kitchen-garden[/box]

Save

Save

Save

Save

Categories
Vegetable Gardening

5 Tips for Preparing Your Kitchen Garden for Winters

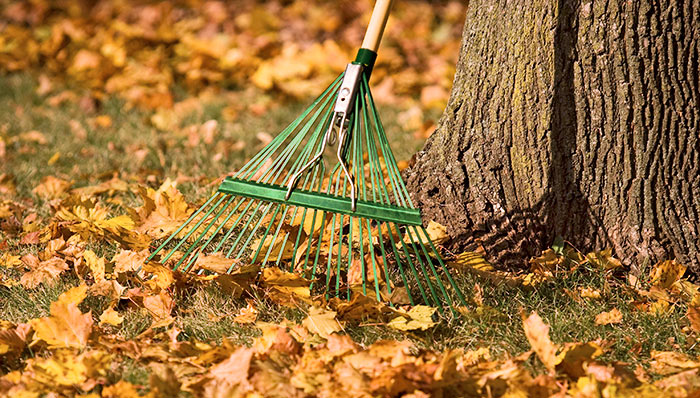
Introduction

In many countries of the world especially that are in Northern Hemisphere, the autumn season hits the ground as you turned your calendar to September 1st. The countries like United States, United Kingdom, Ireland, India, and Pakistan for example start witnessing autumn in September.The daylight gets shorter and night is cooler. Now for me, it is the time to start preparing kitchen garden for winters. In fact, it is the time for every dirt lover involved in urban gardening to start preparing garden for winters.

You are now aware that today’s article will be highlighting some tips to safeguard your kitchen garden from freezing winters to have a healthy and fresh soil for spring cultivation. Preparing kitchen garden for winters is necessary because, you may postpone or challenge winter for a while by covering the vegetables or herbs in urban garden with a sheet, but you cannot force your plants from going into hibernation or halt due to chilling temperature and declining light. Plus, it is a good time to start collecting the ripened veggies or fruits and start cleaning the soil of your kitchen garden.

If you have sown carrots, turnip, sugar beet, beet root, reddish, garlic or leeks, leave them inside the soil to harvest in early winters. But make sure of putting mark for identification and mulch on them to protect ground from thawing so that you can pull them out in snow.

Here are five tips that you should follow in urban gardening while preparing garden for winters.

1. Cleaning the Garden Beds

Cleaning should be prioritized at first while preparing kitchen garden for winters. A messy garden is common by the end of the growing season. Do not panic. Just divide your time by selecting one bed or a particular patch in kitchen garden daily. Make sure there are no rotting fruits or veggies left in the garden as several pests and light blight can overwinter on them. It is wise to put any leftover fruits or veggies in your composting bin. After cleaning, put an inch or 2 inch layer of compost and mulch on the soil beds. This will help soil from freezing completely.

Cleaning the Beds

2.Testing Your Soil  

By the end of the current season, your urban garden has feed you enough. Now it is time to check the health of soil. A good idea about soil health can be deduced by test of soil. Level of calcium, potassium, phosphorous, sulfur and magnesium can be estimated. Organic matter content and soil pH is also checked through a soil test. This test will also aid you in deciding about the amount of lime and fertilizer needed for your soil. Adding lime is always beneficial especially in winters, where it has sufficient time to mix with the soil and adjust soil pH.

Soil Test

3. Kitchen Garden Expansion  

This is my top advice to every dirt lover. Winter is the best time to expand your kitchen garden. You can do this in many ways. One of these is adding few new raised beds or even following the modern day urban gardening technique of adding square foot gardens above the grass. That is why, many online stores, nurseries and plant stores sell packed organic garden soil during the fall. You should add compost as you prepare your new patch of kitchen garden. In this manner, not only your goal of preparing kitchen garden for winters fulfill but you will also have access to healthy, fresh and expanded space for gardening in early spring.

Expanding Kitchen Garden

4. Collect Leaves

Winter season is truly a gold mine for kitchen gardeners and those who prepare their own compost. Collect leaves as much as you can. Put them in your composting bin. The fall brown leaves are rich in carbon thus are important in maintaining a good ratio of carbon-nitrogen in your compost bin. It is always best to hold these leaves with you if you are composting so that these can be added timely whenever nitrogen content of compost bin start accelerating. Another use of these leaves is to shred them and putting a layer of leaf mulch over the soil during winters. This will help in subdue weed growth, retaining of moisture and added nutrients as it decomposes in soil.

You Know Preparing Your Own Compost at Home is Easy? Find Our More Here

Composting the Fall Leaves

5. Tillage the Soil

Tillage of kitchen garden soil is the last step in preparing kitchen garden for winters. Why? The reason is simple. There are many pests and harmful insects preparing themselves to hibernate in your urban garden soil to overwinter. Till of soil exposes them and reduce their population. This allows you to have a peaceful farming during upcoming spring and summer season.

Soil Tillage

Happy Growing and Eating 🙂

Cite this Article in APA Style as:

[box type=”note” align=”aligncenter” ]Rahman, M. A. (2017, September 05). 5 Tips for Preparing Your Kitchen Garden for Winters [Blog Post]. Retrieved from http://aridagriculture.com/2017/07/23/5-tips-for-preparing-your-kitchen-garden-for-winters/[/box]

Save

Save

Save

Save

Save

Save

Save

Save

Save

Save

Categories
Vegetable Gardening

Preparing Compost for Kitchen Garden at Home: Beginners Guide

Introduction

Like your own health, the soil in your kitchen garden should also be healthy to perform gardening functions optimally. A continuous supply of nutrients is necessary so that vegetables, fruits or plants you have grown give you best production. Believe me; I have seen many blooming gardens turning into trash within not time. The reason is simple. You are harvesting the energy of the soil of your kitchen garden and not returning it back. This problem is common in urban gardening systems where the focus is to get more production from little space without refueling the soil to desire extent. To address this issue, today I am going to write on preparing compost for your kitchen garden at home. This article is a beginners guide for preparing compost at home. Before moving ahead, if you are planning of making compost of your own, start preparing now, as it will take at least one year to get it.

Starting Compost at Home

Now as you are all set to start making compost of your own, keep in mind these below bullet points;

  • Where to make compost?
  • Location
  • How to prepare compost?
  • Temperature Requirement for making compost.
  • Carbon-Nitrogen ratio
  • Precautions while preparing compost

Where to Make Compost?

The first and foremost element to address while planning to prepare compost is the selection of appropriate composting bin. Many online websites sell composting bins and barrels crafted specifically for urban gardening. They have a small inlet door where you can add composting input material.

Black Color Containers for Composting

I recommend every reader of mine to have a composting bin in his/her kitchen garden. Alternatively, you can also prepare your own traditional composting box made up of timber. This option also allows the freedom to customize the size of composting container as per your garden requirement.

Location

Location of placing the composting bin, barrel or container is important. It’s better to place it where people gathering are not frequent. This is due to the stink production as microbes start preparing compost for you. Then it is also important that your composting bin have sufficient access to sunlight.

Location of Compost Bin

The color of the composting bin is usually black. This is mainly to absorb more sunlight. In case you are using your home made timber composting bin, I recommend covering it with black tarp. This will work in the same manner.

Input Material for Making Compost

Being organic farming proponent, your kitchen garden soil should be fed with organic compost. And this is actually the goal of urban gardening to grow organic and eat fresh. So to get organic compost, the input should also be organic. There should be no chemical based or chemical added products in your compost input materials.

Input Material for Composting

For organic composting, you can add fruits and vegetables refuses, paper, small wooden sticks, newspapers, straws and grass clippings. Let me be clear, that newspaper may have chemicals in it, but its amount is negligible. If you are short of input material for making compost in kitchen garden, you can knock the door of your neighbors and ask them for their vegetable and fruit extras. If there are horses, sheep, goat or other livestock around your premises, feel free to add nutrient rich pack of manure in your composting bin.

Temperature Requirement for Making Compost

While preparing compost for you urban garden, temperature is the most critical factor to be looked at. Scientifically, a temperature between 140-160 Fahrenheit is best for composting. At this temperature, the microbes are mostly busy and effective in decaying process and making compost.

Maintain Optimum Temperature for Composting

However, if this range of temperature is not achievable in your kitchen garden environment, do not worry; microbes will still perform their duty as they also generate temperature of their own while decaying and composting. Just be sure that your composting bin is not in freezing temperature.

Carbon-Nitrogen Ratio

Like temperature, maintain carbon-nitrogen ratio while adding composting input materials. Any imbalance will affect the quality and later the performance of your compost in kitchen garden. A general rule is to maintain have 30:1 carbon-nitrogen ratio that is 30 parts of carbon and 1 part of nitrogen. Excess carbon will slow the decay process, while high nitrogen creates mess in the form of smell.

Carbon-Nitrogen Ratio in Compost

Now the next question here what are the best sources of Carbon and Nitrogen? As per my recommendation, for carbon, you must include following in your composting material;

  • Corn stalks
  • Card boards
  • Straws
  • Leaves
  • Ashes
  • Fruit shells of peanuts
  • Pine needles
  • Saw dust

On the other hand, fine sources of nitrogen are;

  • Vegetable scraps
  • Clover
  • Coffee grounds
  • Grass clippings
  • Garden waste
  • Hay
  • Manure
  • Seaweed
Ready Compost

Precautions while preparing compost

I hope your question how to prepare compost in kitchen garden at home has been addressed successfully. Below is the list of precautionary measures that should be given due consideration while preparing compost for urban gardening especially if you are a beginner in composting.

  • Stirring the decaying compost in the container is of great importance. Use garden fork for this purpose. At least do this exercise once a week. This allows good aeration to decaying compost and enhancement in composting process.
  • Black Color of composting container is important. As I mentioned earlier, use black tarp over your timber composting container for this purpose to absorb maximum sunlight.
  • Collect Liquid Compost In some purchased composting containers, there is an option that allows rain water to pass through inside the decaying material and collect at the bottom. In that case, collect that precious nutrient rich water and apply to your plants in kitchen garden.
  • Compost is Ready to Harvest for kitchen garden when it is decayed to a point that it appears like healthy and rich soil.
  • Apply your homemade compost to the plants which are at least 8-12 inches tall. Put an inch of compost around the stem and blend it in the soil.

Happy growing and eating 🙂

Facing Low Seed Germination Rate in Your Kitchen Garden? Here are Few Tips to Increase Seed Germination

Cite this Article in APA Style as:

[box type=”note” align=”aligncenter” ]Rahman, M. A. (2017, September 03). Preparing Compost for Kitchen Garden at Home: Beginners Guide [Blog Post]. Retrieved from http://aridagriculture.com/2017/09/03/preparing-compost-for-kitchen-garden-at-home-beginners-guide/[/box]

Save

Save

Save

Categories
Vegetable Gardening

Using Diatomaceous Earth in Kitchen Garden to Control Pest

Introduction

The biggest concern of my blog readers and followers are the pests that attack and harm their beloved veggies, fruits and plants grown in kitchen garden, backyards, terrace gardens and in pots or containers in the modern day urban gardening system. In fact, if you search Google Analytics, you will get more queries regarding how to control pest in kitchen garden? rather ways of growing them. To help my readers and followers, today I am going to tell you guys about an innovative mode to control pest in kitchen garden. I got my hands on this technique while I was at an International conference about pest control few years back in Karachi-Pakistan. In simple yet effective manner, this technique involves the application of Diatomaceous Earth (DE) around your plants to hamper pest movements towards plant by killing them.

Diatomaceous Earth to Control Pests

What is Diatomaceous Earth (DE)?

You know about marine phytoplankton? Right! Diatomaceous Earth (DE) is actually the remains of skeleton of these phytoplanktons after they get fossilized.  The skeleton is made of silica which is natural and found extensively in earth’s crust. It is generally off-white in color and looks like talcum powder. Believe me, anyone maintain a kitchen garden and suffering from the problem of pest attack, Diatomaceous Earth (DE) is the ultimate solution to control pest in kitchen garden. The reason is that, this soft talcum powder like material is microscopically sharp enough to harm exoskeleton or soft waxy body layer of the pests in your urban gardening system.

Your Seeds are Not Germinating Well? Read This Article to Get Your Problem Solved

The Working of Diatomaceous Earth (DE)

The working of Diatomaceous Earth (DE) is simple. It works in dual ways.

  1. The sharp needle like elements of Diatomaceous Earth (DE) gets stick between the exoskeleton of the pests in your kitchen garden. After sticking, they start to fracture and cuts the body of the pest as it moves on the ground.
  2. On the other hand, the pests like slugs and snails are also afraid of Diatomaceous Earth (DE). How? They have very sensitive waxy skin. When their body gets in contact with Diatomaceous Earth (DE), it cuts the body and makes them dehydrate by losing body water and eventually, the pest dies. Hence the dream to control pest in kitchen garden becomes reality.
Diatomaceous Earth Against Snails

Where to Get Diatomaceous Earth (DE)?

Western United States of America has large deposits of Diatomaceous Earth (DE) in the territories where there were once lakes millions of years ago. However, you don’t need to visit these places to get it. For your kitchen garden, it is easily available in many online websites and some seed stores. One thing should be kept in mind that whenever you buy Diatomaceous Earth (DE), ask for ‘food grade’ version of it rather ‘pool filter’ version for your urban gardening system. This is because the one use in swimming pool filters is not effective against pests.

How to Use Diatomaceous Earth (DE)?

The use of Diatomaceous Earth (DE) in your kitchen garden is so simple, easy and safe that your 10 year old kid can apply it with no harm. Just sprinkle it around the stem of your plant or even you can dust it on the leaves in case of veggies like sugar beet, beet roots and potatoes where there is greater risk of beetle larvae. However, it should be noted that in case of urban gardening in cities, it should be applied when it is perfectly in dry form around 10:00 hours in the morning. Its effectiveness losses as it get wet. This means, you have to reapply it if your kitchen garden encounters rain.

Dusting on Plant Leaves Diatomaceous Earth to Control Pests

Is Diatomaceous Earth (DE) is Safe to Use?

Last but not the least, I know this is what is revolving in your mind that whether using Diatomaceous Earth (DE) is safe to control pest in kitchen garden? For this, I say a big yes. Why? because we have been consuming Diatomaceous Earth (DE) unconsciously for so many years. The grain stores use Diatomaceous Earth (DE) to protect grains from pests and we ingest it in the shape of our food. It is readily mix in toothpastes also. Thus, it is in-toxic.

However, I will recommend my readers to take precautionary measures while applying it in your kitchen garden. Some people may get irritation in eyes, nose, skin and throat if they get in touch with the powder of Diatomaceous Earth (DE). My advice is to wear a mouth mask and full sleeves while applying Diatomaceous Earth (DE) in your urban gardening system.

Similarly, Diatomaceous Earth (DE) doesn’t harm your soil as it is made of silica. Silica is readily available in sands and in rocks. However, in case of rain, it may get washed. However, it will not harm any human, animal, birds or aquatic life.

As I am big proponent of organic farming, anyone who is facing rough and tough with pests in their kitchen garden and annoyed due to its activities, give a first try to Diatomaceous Earth (DE)  instead of chemicals or synthetics in your kitchen garden to control pests. Diatomaceous Earth (DE) is considered organic by the Organic Materials Review Institute.

Who Can be Victims of Diatomaceous Earth (DE)?

Diatomaceous Earth (DE) is a powerful tool to to control pest in kitchen garden like;

  • Caterpillars
  • Aphids
  • Beetles
  • Fleas
  • Cockroaches
  • Bed bugs etc.
  • Snails
  • Slugs
Diatomaceous Earth to Control Beetles in Kitchen Garden

Happy Growing and Eating 🙂

Confused What to Grow in Your Backyard? Read this Article and Get Your Problem Solved

Cite this Article in APA Style as:

[box type=”note” align=”aligncenter” ]Rahman, M. A. (2017, September 01). Using Diatomaceous Earth in Kitchen Garden to Control Pest [Blog Post]. Retrieved from http://aridagriculture.com/2017/09/01/using-diatomaceous-earth-in-kitchen-garden-to-control-pest/[/box]

Save

Save

Save

Save

Save

Save

Save

Categories
Vegetable Gardening

How to Grow Protein Rich Mushroom Indoors in Kitchen Garden?

Introduction

Today i am going to write on a non-traditional vegetable that very few of us grow in kitchen garden. The modern techniques now available in urban gardening have provided freedom to grow such vegetables. One of these is Mushroom. Surprised?  Growing Mushroom is fun and easy. Mushrooms are an excellent source of protein and can be a replica of meat especially for vegetarians. Keeping this in view, my today topic will focus on how to grow Mushroom in indoor kitchen garden?

Are you a Beginner? Learn How to Start a Kitchen Garden

What are Mushrooms?

Mushrooms are a kind of fungus but edible and nutritious as well. Round 400 among 20,000 varieties are edible. One thing should be kept in mind that some vibrantly colored Mushrooms are extremely poisonous and capable of causing immediate death. So if you have a plan of growing Mushroom in your indoor kitchen garden, here are three top edible varieties that can be grown suitably in urban gardening system.

  • Button Mushrooms
Button Mushroom
  • Oyster Mushrooms
Oyster Mushroom
  • Enoki Mushrooms
Enoki Mushroom

How to Grow Mushroom?

I hope so far I have activated your taste buds. Do you remember the flavor and texture of Mushrooms that you bought from a super store? If yes, then I have a superb idea of growing Mushroom. Yes, your own fresh Mushrooms at indoor kitchen garden. Trust me it’s not that difficult as it seems. Mushrooms need dark, moist and cooler place to grow. In urban gardening, you have the liberty to customize your way of growing Mushroom.

To start growing Mushroom in your indoor kitchen garden, you need spores. Mushroom needs spores (particularly known variety) mixed with grains i.e. wheat or millet seeds known as ‘spawn’. Spores are the whitish colored mycelium of mature Mushroom. This spawn can be obtained from local lab, nursery or online seed store. However, my recommendation is to look for freshly prepared spawn of known variety from local Mushroom spawn lab. Many online seed stores also sell these spawns of high quality. These may be expensive than lab or nursery option, but their viability is better.

Spawns of Mushroom

Growing Mushroom Spawns

Spawn needs a growth medium also referred to as substrate i.e. sawdust whose texture highly resembles the woody sections of forest where you must have observed umbrella shaped bodies of Mushrooms. So in urban gardening of Mushrooms in your kitchen garden, you need sawdust and any medium sized plastic bag available to you. Keep in mind that sawdust needs to be pasteurized first. Pasteurization can be performed by adding the sawdust in hot water with temperature 60-70 degree Celsius. Leave it for half hour. It will kill dangerous micro-organisms leaving behind some friendly microbes that are helpful for growing Mushrooms. Remove the sawdust from water, leave it cool down. Place some of this spawn in plastic envelope; it may contain slight moisture which can be felt by keeping little sawdust in palm of hands.

Mushroom in Sawdust

The Final Stage

Here comes the last stage of growing Mushroom in your indoor kitchen garden. Now add spawn by spreading it all over the growth medium i.e. the sawdust. Add another layer of sawdust followed by the addition of spawn. This layering ensures rapid growth of spores. Seal the envelop and isolate it in some cool dark and moist place in your home. Don’t peep through the envelope and have some patience.  After a week, you can examine the spread of whiteness all across the sawdust. Seal and leave it again.

After few days, small rosette shaped structures with a tiny stalk can be seen with naked eye. From now on-wards, allow some aeration in the room and keep the mouth of envelope open. There is no need to water the growing Mushroom. Just keep the surroundings of plastic bag moist. After a month of inoculation, well grown Mushrooms can be harvested from your indoor kitchen garden.

Indoor Kitchen Garden Mushrooms

Enjoy an extra topping of your own grown healthy-fresh Mushrooms in pizza or supply them to local market or vegetable shop on demand; an excellent home business option for Mushroom lovers. I hope my readers are now well aware of how to grow Mushroom?

Cheers and Happy Growing 🙂

Cite this Article in APA Style as:

[box type=”note” align=”aligncenter” ]Rahman, M. A. (2017, August 28). How to Grow Protein Rich Mushroom Indoors in Kitchen Garden? [Blog Post]. Retrieved from http://aridagriculture.com/2017/08/28/how-to-grow-protein-rich-mushroom-indoors-in-kitchen-garden/[/box]

Save

Save

Save

Save

Save