Categories
Vegetable Gardening

Square Foot Gardening

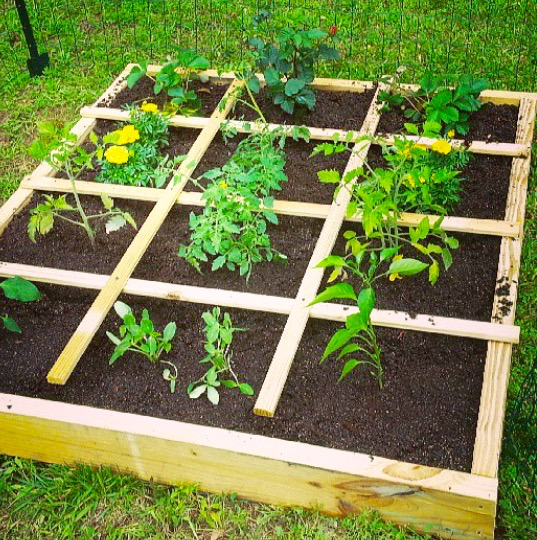
Introduction

Square Foot Gardening is an innovative and advance technique of planning small but intensively planted gardens at home. Mel Bartholomew is considered as the pioneer to coin the term Square Foot Gardening. The beauty of this farming technique resides in its application of organic farming techniques combined with other innovative methods to get more and better production from a small piece of land especially in vegetable gardens.

Square Foot Gardening  includes the application of organic gardening techniques along with strong emphasis on composting methods, planting the plants closely and intensively, making raised beds and also bio intensive attention to a small yet clearly defined area of garden.   

Square Foot Gardening

Importance of Square Foot Gardening

The success of this technique lies in the fact that this method is quite beneficial in those areas where the gardener is facing the problem of poor quality of soil. By selecting a confined area for gardening, that plot can be modifies according to the desire and best quality of output as well as production can be obtained. This technique is equally beneficial for those who are new to vegetable gardening or backyard gardening. It is also proved to be a recreational activity for the people with disabilities those allowing them to enjoy the leisure time efficiently.

Method of Square Foot Gardening

The basic idea behind this technique is using an open bottomed box that is placed on the soil that contain finite amount of soil. This soil is then divided into various sections according to the desire using grids. To get good quality and quantity of production from vegetable gardening crops each square would be planted with different kind of crop plants. In case of ornamental gardening, the Square Foot gardening is equally beneficial in a sense that spate type of flowers can be grown in each square to increase the aesthetic sense of the garden.   

Square Foot Farming 1 | Arid Agriculture
Square Foot Farming 1

Vegetable Gardening Recommendation for Square Foot Gardening

The Square Foot gardening can be used differently for different types of crops. For instance, a single Tomato plant might consume a full square. Similarly, herbs like Oregano, Mint or Basil also consume a full square. On the other hand, Strawberry plants can be planted four per square. In case of vegetables, sixteen radishes can also be planted and grown per square.

The smaller beds used in square foot gardening are helpful in easy adaptation of the farmer with his/her garden. He can have reach to every single inch of the entire area for gardening practices by avoiding direct stepping on the soil ad making it compact.  

Square Foot Gardening is Effective for Weed Control

Square Foot Gardening  is effective for weed control in a sense that a weed barrier can be made beneath the square foot box. At the bottom of the box, it can be filled with a combination of one third of decayed Sphagnum (peat moss), one third of compost and one third of vermiculture.

Cite this Article in APA Style as:

[box type=”note” align=”aligncenter” ]Rahman, M. A. (2018, March 20). Square Foot Gardening [Blog Post]. Retrieved from http://aridagriculture.com/2018/03/20/square-foot-gardening/ [/box]

Categories
Vegetable Gardening

Ultimate Guide to Prepare a Winter Vegetable Garden

Introduction

As summer takes its final breaths, it’s time to pull ourselves together to prepare for a winter vegetable garden. With the arrival of cool morning breeze, this change in temperature directs us towards getting equip with all the resources needed for preparing a perfect fall vegetable garden. It is the time to welcome new seeds in your vegetable garden. Your autumn garden is all set to accept these new seeds to be sowed for winter vegetable garden.

This article is dedicated to urban dirt lovers to guide them for preparing a perfect winter vegetable garden. This will ensure healthy supply of organic food as meals on their dining tables during cold day lunches, supper and dinner.  

There are certain steps that should be carried out in your winter vegetable garden while preparing to face cold breezes and to have your kitchen basket full of fresh veggies all the season.

Removal of Debris

At the start of autumn garden should be treated as your child who needs to be pampered before the winter comes around. Autumn season is perfect to do all necessary actions to make your garden ready for winter crops.

In addition to this, autumn garden should be tackled in such a way that it strengthens the vegetable garden for the next two season viz., winter and summer.

So, first step to prepare for winter vegetable garden is to make sure that all the dead plants and other debris are removed and cleaned out from the soil. Any deceased plant left, can cause the spread of a disease. A dirty vegetable garden means unhealthy gardening. So start with cleaning the garden.

On the other hand, healthy left over’s of plants or plant debris should be mixed with the compost to make the soil healthy and nutritious. Adding them into the crops of vegetable garden optimize the drainage, expose oxygen, release compaction and enriches the soil.

Adding Strength to the Soil of Winter Vegetable Garden

In my opinion, using chemicals in your soil during preparations of winter vegetable garden will be quite harmful especially when there is another way out. The soil can be enhanced and enriched by adding compost (homemade compost or commercial compost), vermicompost, compost tea, cover crops and animals manure. In case of animal manure, animals should also be fed with the organic feed. This will be less expensive and completely natural.

It should be kept in mind that, your vegetable garden is exhausted producing all those crops during spring and summer, spending so much energy and nutrition.

Amongst the wide range of options available for adding strength to the soil, fall is the season to flourish your fall vegetable garden and make it healthy and refresh all over again.

On the other hand, winter rains carry lots of nutrition which get buried deep underground in the soil. So I suggest tilling vegetable garden soil as it is important if you want to avoid surface run off.

Continue to Next Page Arid | Agriculture | Vegetable Gardening

Categories
Vegetable Gardening

How to do Worm Farming for Vegetable Garden?

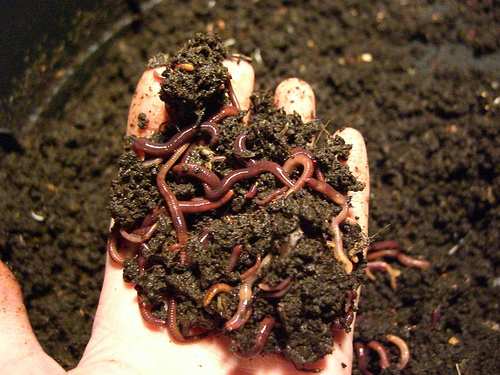
Introduction

Technically, worm farming is called as vermiculture or vermicomposting. It is a tremendous way to minimize food waste generated in your kitchen. This kitchen waste, which is organic in nature, is the source of food for the worms present in the soil. The organic waste is used by the worms as food. They decompose it into nutrient rich material. As this decomposing is carried out in the soil, the nutritious material made by the worms is readily available for the plant growth in your vegetable garden.

How Worm Farming is Beneficial?

Worm farming or Vermicompost plays a vital role in improving soil texture, structure and aeration. It also adds strength to the soil in terms of increasing water-holding capacity of the soil. The vegetables you grow will develop a deep and strong root system that is beneficial to fight diseases and sustain under harsh conditions.

The output of worms which is also called as wormpoop or worm castings is perfect to generate top soil in vegetable gardening. On the other hand, the fluid produced in the process of vermicomposting is used as fertilizer. The excess fluid can be stored in a bottle for later use.  Similarly, vermicomposting also adds valuable microorganisms to the soil. The advantage of these microorganisms is that they, along with the soil fauna, aid in breaking organic materials and convert nutrients into a more readily available food form for the plants

Another benefit of worm farming is that, you can use your organic kitchen waste in vermiculture instead of going to throw or landfill it.

Continue to Next Page

Categories
Agriculture Corner

Water Conservation Techniques in Arid or Dryland Agriculture Systems

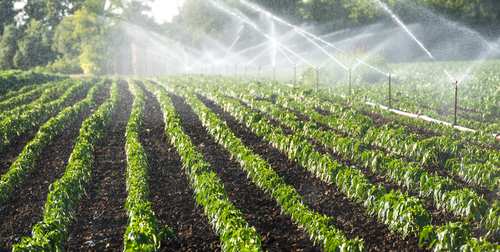
Introduction

Water is a jewel for arid agriculture farmers. Rainfall being the chief source of water for cropping purposes in these areas is precious. Arid areas are characterized by very low rainfall (less than 100mm as defined by FAO) high temperature and barren land. Even after the rainfall, the rate of evaporation and evapo-transpiration from water body structures and plants is high that available water loses at a fast pace.

How Arid or Dryland are Formed?

Arid or Dryland are formed naturally. This happens when topographic, climatic and oceanographic elements create hindrances in the way of moisture-bearing weather systems to reach that zone.

Special Treatment for Arid Lands

To sustain agricultural activities and generate food and livelihoods of the farmers of arid zones, special measures are taken in each cropping activity right from sowing to harvesting and post-harvesting. However, water has central importance in this scenario and conservation of available water (through any mode of precipitation) requires special structures and techniques.

This article will highlight 5 best suited and easy to install methods of water conservation in Arid or Dryland agriculture systems.

1. Micro or Drip Irrigation

This is the most effective and efficient way of water conservation technique suitable for arid lands. Not only this method helps in water conservation, but it also help in soil conservation. In this method, water is delivered to plants from soil surface using a system of tubes that bear small holes and other destructive outlets. This method also allows the application of fertilizer by mixing it with irrigation water through Drip irrigation. It has been estimated that drip irrigation saves 50-70 percent water as compare to traditional methods of irrigation and also it supplements more crop production by 20-90 percent due to direct availability of fertilizer to plants.

Drip Irrigation in Arid Agriculture

2. Zai Pits

Another efficient method of water conservation in arid agriculture systems is Zai Pits. These planting pits are made around the plants and trees to conserve water and moisture. The pits are prepared with hands. The excavated soil generated during digging is used to make small ridges around the pits. This helps in capturing maximum rain water. Usually these are 10 inches deep and wide and 3 feet apart (25cm x 25cm holes one meter apart). The objective is to trap rain water to increase moisture around the plant. It also aids in increasing soil fertility especially in dryland or arid regions where occurrence of crusty and degraded soil is common. These pits are then planted with a mixture of crop residues, compost, animal manure and seeds. These are then covered with mulch made of leaves or grass to conserve moisture. This simple looking technique can increase the agriculture produce by 50 percent within three years of practice.

Zai Pits
Zai Pits

Continue to Next Page

Categories
Vegetable Gardening

How to Grow Cucumber in Your Vegetable Garden?

Introduction

Sorry for a long gap. I was busy in cleaning up my vegetable garden and preparing it for winters. My preference for winter is to cultivate underground veggies like Turnip, Radish, Garlic, Sugar Beet and Beet Root. I have prepared the raised beds now with added compost. However, keeping in view the vegetable gardening calendar, there is plenty of time left in winters for my Cucumbers to give me some more organic and fresh fruits. I have been growing Cucumber for the last 7 years and believe me they are so easy to grow and require less care. So today, I am going to write on how to grow Cucumbers in your vegetable garden?

Cucumber in Vegetable Garden

Without Cucumber, I feel my kitchen garden empty. Usually, I use my own seeds, saved from last year harvest. An advantage of having Cucumber in vegetable garden is that, they occupy less ground and vines can be propagated in any way you want. Vegetable garden looks greenish and soothing to eyes and its fruit gives you a fine style of health and happiness with a condition that you are using compost not the synthetic fertilizer. A Cucumber plant adds yellow flowers and curling tendrils to your vegetable garden.

Climatic and Soil Condition Required for Cucumbers

There are two types of Cucumber; the Bush Cucumbers and Vining Cucumber. I prefer Vining ones for vegetable gardens because of the foliage and less ground occupation plus the growth is fast and fruits are abundant than Bush variety.

Cucumber is usually warm season vegetable and thrives well when ground temperature is around 60 to 70 F. The soil pH should be around 7. A fertile soil is the chief demand by a Cucumber plant. Use compost for adding desired nutrients. You may also use aged manure for this purpose.

Sowing the Cucumber

For vegetable garden sowing, plant the seeds 1 inch deep in soil. The distance for Bush variety should be 30-60 inches and at least 1 foot distance should be maintained in case of Vine Cucumbers. For transplants, they should be sown 2 inches deep while distance should be same as mentioned earlier

Soil Condition

The soil requirement is moist and well drainage should be characteristic of the soil. Soggy soil is the enemy of your Cucumber plant. A soil, mixed with compost results in healthy and fast growth in vegetable garden.

Managing the Vines

A trellis is the best option for allowing the vines to climb especially when the space is an issue. Trellising is preferred to safeguard the fruit from damage from lying on the damp ground.

Continue to Next Page

Categories
Vegetable Gardening

How to Grow Lettuce Leaves in a Container?

Introduction

Today, I am going to share my experience of how to grow lettuce in a container placed anywhere in your kitchen or vegetable garden. Lettuce is a kind of vegetable that can be grown all-round the year in any climatic conditions. On top of it, its nutritious value is high and is best suited food ingredient for people who are on a diet. Low in saturated fats and sodium, lettuce is rich in;

  • Thiamin
  • Iron
  • Vitamin B6
  • Potassium

In addition to this, it is a good supplier of;

  • Dietary Fiber
  • Folate
  • Manganese
  • Vitamin A
  • Vitamin C
  • Vitamin K

Vegetable Gardening for Beginners: a Complete Guide

Lettuce in Urban Gardening Containers

Urban gardening is gaining popularity these days as it can add a joyous activity in your daily busy and hectic life. On the other hand, it also adds fresh and juicy vegetables for your meals and a healthy life style.

Lettuce

Salads are a vital part of our food, offering lots of valuable vitamins with least calories, thus ideal food for diet conscious people. For this purpose, lettuce are easy to grow in container of your vegetable garden that will return you with multiple harvests. Growing lettuce in kitchen garden can be an amazing experience for the beginners.

Below lines will guide you with the steps of how to grow lettuce in a container of your kitchen garden.

What do you Need?

Lettuce plant allows you multiple harvests, i.e. as you collect the leaves, new ones grow in place of older. For this reason, it is very important to have;

  • Proper quality potting soil
  • Good quality seeds.
  • Right size container

Recommended Container & Potting Soil for Growing Lettuce

Soil: First step in how to grow lettuce is the selection of proper soil. Good quality potting soil is available in the near nursery store while many online stores also offer potting soils for lettuce. Just be sure that potting soil for lettuce should have a mix of soil, peat or compost and vermiculite or perlite. This soil mix allows good water retention that is best suited for lettuce in containers.

Seeds: There are various varieties available for growing lettuce in a container. In fact when you search for a variety of lettuce, you will be amazed that there are endless varieties of lettuce available. My recommendation is to select the variety you like the most. This is because, different varieties taste differently. Among many, you can chose;

  • Crisphead
  • Butterhead
  • Lose leaf
  • Summer Crisp
  • Little Gem
Lettuce Varieties for Container Farming

What I have grown in container of my vegetable garden is Little Gem variety. This variety was originated in France. You will find this variety crunchy, sweet in taste with miniature heads of lettuce that are full of nooks and crannies.  Little Gem variety of lettuce is best for salad dressing and can be cooked for food.

Container: The container should have an appropriate size with drainage holes. My container size is 12 inch and it has already given me 3 harvests and still lettuce plants are performing well. The container should have appropriate size because as the lettuce plant grows the root system also expands.

Growing Lettuce in a Container

Sowing the Lettuce

Now you have reached the most important phase of growing lettuce in container. Choose the place that has good access to sunlight. Lettuce loves sunlight. Its large green leaves love to do photosynthesis a lot. So it is highly recommended to move the container into a brighter space with at least 8 hours sunlight access.

Now moving to the sowing phase, fill your container with potting soil up to an inch or even two centimeters below the rim. For direct sowing, place the seed 1/4 to 1/2 half inch deep and then cover with soil. The soil should be moistened.

It is recommended to sow your seeds 4 to 6 inches apart. on the contrary, I have sown my Little Gem lettuce seeds 3 inch apart and I am getting good produce of lettuce in container. However, if you are planning to cultivate Lose Leaf variety of lettuce, 4-6 inch distance is a must. Remember that the seedbed of your lettuce in container never dry out.

Sowing Lettuce Seeds

Caring the Growing Lettuce in Container

Now you have passed the important steps of growing lettuce in a container. Wait for germination. Usually it takes 5 to 10 days for germinating. Your newly born tiny lettuce plants need your care. Following are few points that should be taken care of while growing lettuce in a container.

  • Never add synthetic fertilizer to your lettuce in container of urban garden. The objective of having fresh and organic vegetable garden grown lettuce will die at the moment you add a pinch of fertilizer. So avoid it. The potting soil is already rich in nutrients.
  • Add compost ‘if’ needed.

Prepare Your Compost at Home. How? Here is my DIY Article on Making Compost at Home

  • If temperature is around your kitchen garden is more than 30oC, move your container to a shady place. This is the biggest advantage of growing lettuce in a container to customize it in any manner you need.
  • Avoid drying of soil in your lettuce container.

Believe me, the result of all the previous steps and caring you will add to the growing lettuce in container will result in lush green and healthy lettuce leaves. They will be ready to cut right after six weeks after sowing. You can harvest them with a sharp knife but try to harvest little, just the amount you needed.

Germinating Lettuce

 Hey Guys, don’t forget to like and share this post below. It will be a boost-up for me.

Happy Growing and Eating 🙂

Cite this Article in APA Style as:

[box type=”note” align=”aligncenter” ]Rahman, M. A. (2017, September 16). How to Grow Lettuce Leaves In a Container? [Blog Post]. Retrieved from http://aridagriculture.com/2017/09/16/how-to-grow-lettuce-leaves-in-a-container[/box]

Save

Save

Save

Save

Save

Save

Save

Save

Save

Save

Categories
Vegetable Gardening

Post-Storm Irma Tips for Kitchen Gardeners

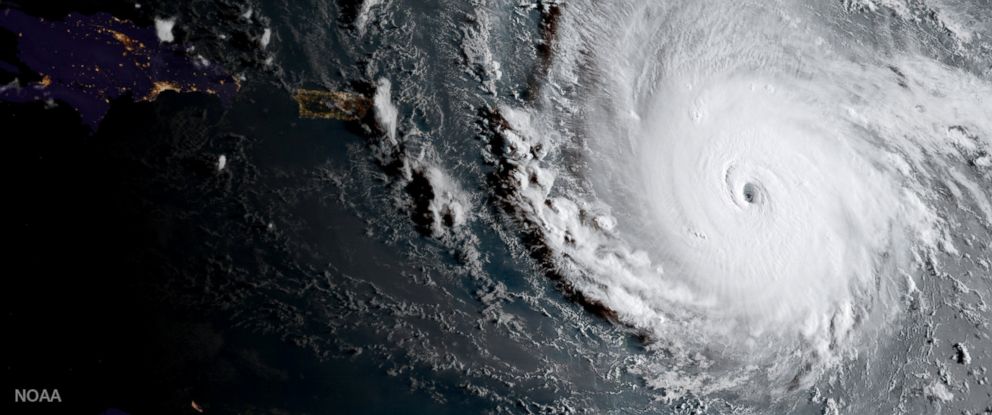
Introduction

I hope my readers and their families are all fine who faced the storm Irma few days back in South and North America. These storms are inevitable in the current global climate change. Even science with today’s level of advancement cannot limit them in boundaries. So we are left with the only option of coping with these storms. Irma has spoiled millions of acres of land, damaging homes, kitchen gardens, parks, landscapes, infrastructures and wealth of people. However, it is the time to rebuild with a new spirit.

As a dirt lover, my concern is the rebuilding of the kitchen gardens that we have at our homes. Being a gardener, I am aware that the high speed winds, floods and salty rain water came with Irma has damaged not only the plants but also the soil. However, if we look at the bright side and think positively, there are few opportunities with the leftovers of Irma that can help us in re-building a prosperous urban garden again in our homes

Here in Pakistan, floods are frequent during the monsoon season (July-September) near the upper Indus Delta. As the flood goes downstream, the land is refilled with fertile soil and minerals that come along with the flood stream. In addition to this, re-shifting of the soil layer also bring positive results on plant health due to added beneficial micro-organisms. But in case of Irma, we have to deal with the water that is added with salts in it. So it is the time to take necessary steps for rebuilding of your urban garden.

First step in re-building of your kitchen garden is the planning to chalk out a pathway. The re-building plan should be categorized into three categories;

  1. Wash down everything
  2. Pruning the leftover plants and cleaning
  3. Recycling or Composting

Wash Down Everything

This is what you should immediately do after a storm. Rinse everything with water in the kitchen garden. This is necessary to remove excess salts came with storm sea water. More the salt stay on the leaves of plants, more it will harm your remaining plants. Even if the storm doesn’t bring sea water, washing everything in your urban garden help removing any harmful and decaying material.

Remove any mud or build of storm from the base of your plants and trees (If they are still left). Mostly trees survive in the storms. However, due to damage on their stem and leaves, there is fair chance that they get infected if you don’t wash them with water after the storm. This will also increase the chance of disease spread in your kitchen garden. Rinsing your plants with water will allow fast pace revival phase.

Some readers may think that adding more water to already saturated soil will damage the roots. But believe me; washing your kitchen garden is much needed after a storm. Removing the mud and other unwanted substances bought with the storm should be done immediately. In addition to this, the water will dilute any contaminants and weaken their power to infect soil and your plants.

Pruning the leftover plants and cleaning

Washing everything in your urban garden will allow you to see a clear picture of what is left in the garden. This will make the next step easy for you. You know what is gone, broken and left over. However, here I recommend waiting a day or two to see any sign of life in your plants. If new branches, leaves or flowers are emerging, give special care to them. Rest of the leaves, branches and stems should be pruned or if damages, they can be removed to allow fresh growth.

Similarly, large trees and shrubs should be given due importance while managing. If they are downed, remove them first. If you have no expertise, consider getting help by calling relevant government agency. This will help you getting security for your family.

Keep in mind to prune gently and less after storm. This is because, plants are already under stress, and pruning them a lot will damage their immunity to regrow. You can further prune in week or two as plant start getting stronger.

Recycling

In the last step of re-rehabilitating your kitchen garden, consider recycling the lost material from your urban garden. How? It is simple; the storms bring not only fertile soil but also rich organic matter. You can prepare your compost pile from the damaged leaves, stems and branches along with the mud came with storm. You can also add some quantity of storm water in your composting bin. The storm water is not drinkable and may contain sewage and industrial waste. This water is fit for accelerating your composting process inside a compost container.

Make Your Own Compost at Home for Urban Gardening. Here are Few Simple Steps

Storm Irma has gone. But that was not the last one. Every country on the globe faces these storms frequently in the changing climate. The need is the better coping and management strategies to minimize loss.

Kitchen garden for a gardener is just like his/her own kid and plants and veggies are darling. Caring them will bring satisfaction and healthy meals to your table.

Be safe, happy growing and eating 🙂

Cite this Article in APA Style as:

[box type=”note” align=”aligncenter” ]Rahman, M. A. (2017, September 12). Post-Storm Irma Tips for Kitchen Gardeners [Blog Post]. Retrieved from http://aridagriculture.com/2017/09/12/post-storm-irma-tips-for-kitchen-gardeners[/box]


Save

Save

Save

Save

Save

Save