Categories
Vegetable Gardening

How to Grow Aloe Vera in Kitchen Garden?

Introduction to Aloe Vera

Aloe Vera?  Ahhh Yes. I was thinking to write about this plant for so long and after many requests on my Facebook page (Arid Agriculture and Kitchen Gardening) and email, I decided to help my readers on how to grow Aloe Vera in kitchen garden? This magical plant is so adaptive that it shows great growth and production afterwards in pots, containers, indoors and outdoors. In the modern day urban gardening, one cannot deny the importance of having an Aloe Vera plant in kitchen garden or indoors. The natives of arid regions are lucky that they can grow Aloe Vera at commercial scale to earn top dollars.

As medicine, moisturizer, soap ingredient and sometime food item, God has gifted Aloe Vera with so many uses that my 600 words article is just an inch to write about it. I have a sweet memory of this plant because of my mom. What i saw during my childhood, whenever my mom got stove burning on finger (quite common in kitchen) or burning the hand by accidentally touching a hot utensil, she always did just one thing. Reach as soon as possible to the kitchen window to get a small piece of Aloe Vera from the pot, peal it from one side and massage its sap on the burned surface of skin. The reason was to get immediate relief from burning pain and no burning scar on the skin. Interestingly, in many parts of the world, Aloe Vera is also called as Burn Plant.

Actually Aloe is native to Africa and there are hundreds of varieties available. The best one is Aloe Vera. There are some edible varieties fit for food, but don’t consumer it in your meals unless and until you are sure that it is fine to consume internally. Some varieties are poisonous too.

How to Grow Aloe Vera?

The answer to how to grow Aloe Vera is that growing Aloe Vera is very easy. As i mentioned earlier, Aloe Vera has the tendency to grow in most of the environments. In urban gardening systems, it can even grow on few inches of soil. Similarly, it can sustain winters. However, freezing temperature is deadly for it. But that’s not an issue. During winter, you can place it indoors at room temperature. However, if you have mild winters in your area, it is good to plant it in open soil. Zones 9 to 11 in USA that are regarded as ‘hard’ are best for Aloe Vera, especially if you are growing Aloe Vera at commercial scale.

Promulgating Aloe Vera

Aloe Vera is grown by propagating the branches from mother plant, from its leaves and also from seeds obtained from its flowers. However, my recommendation is to grow it by propagating as seed sowing will takes a lot of time. Aloe Vera can be propagated anytime of the year, however, spring season is best to get good results. Just be careful that it Aloe Vera needs sunlight and moderate shade is also helpful for fast growth of its branches. Whether you are planning to grow Aloe Vera in kitchen garden or Aloe Vera in Pots or containers, soil should be well drained. I grow Aloe Vera in sandy soil so that water logging is avoided. Aloe Vera is very drought tolerant.

Choosing Pot for Aloe Vera  

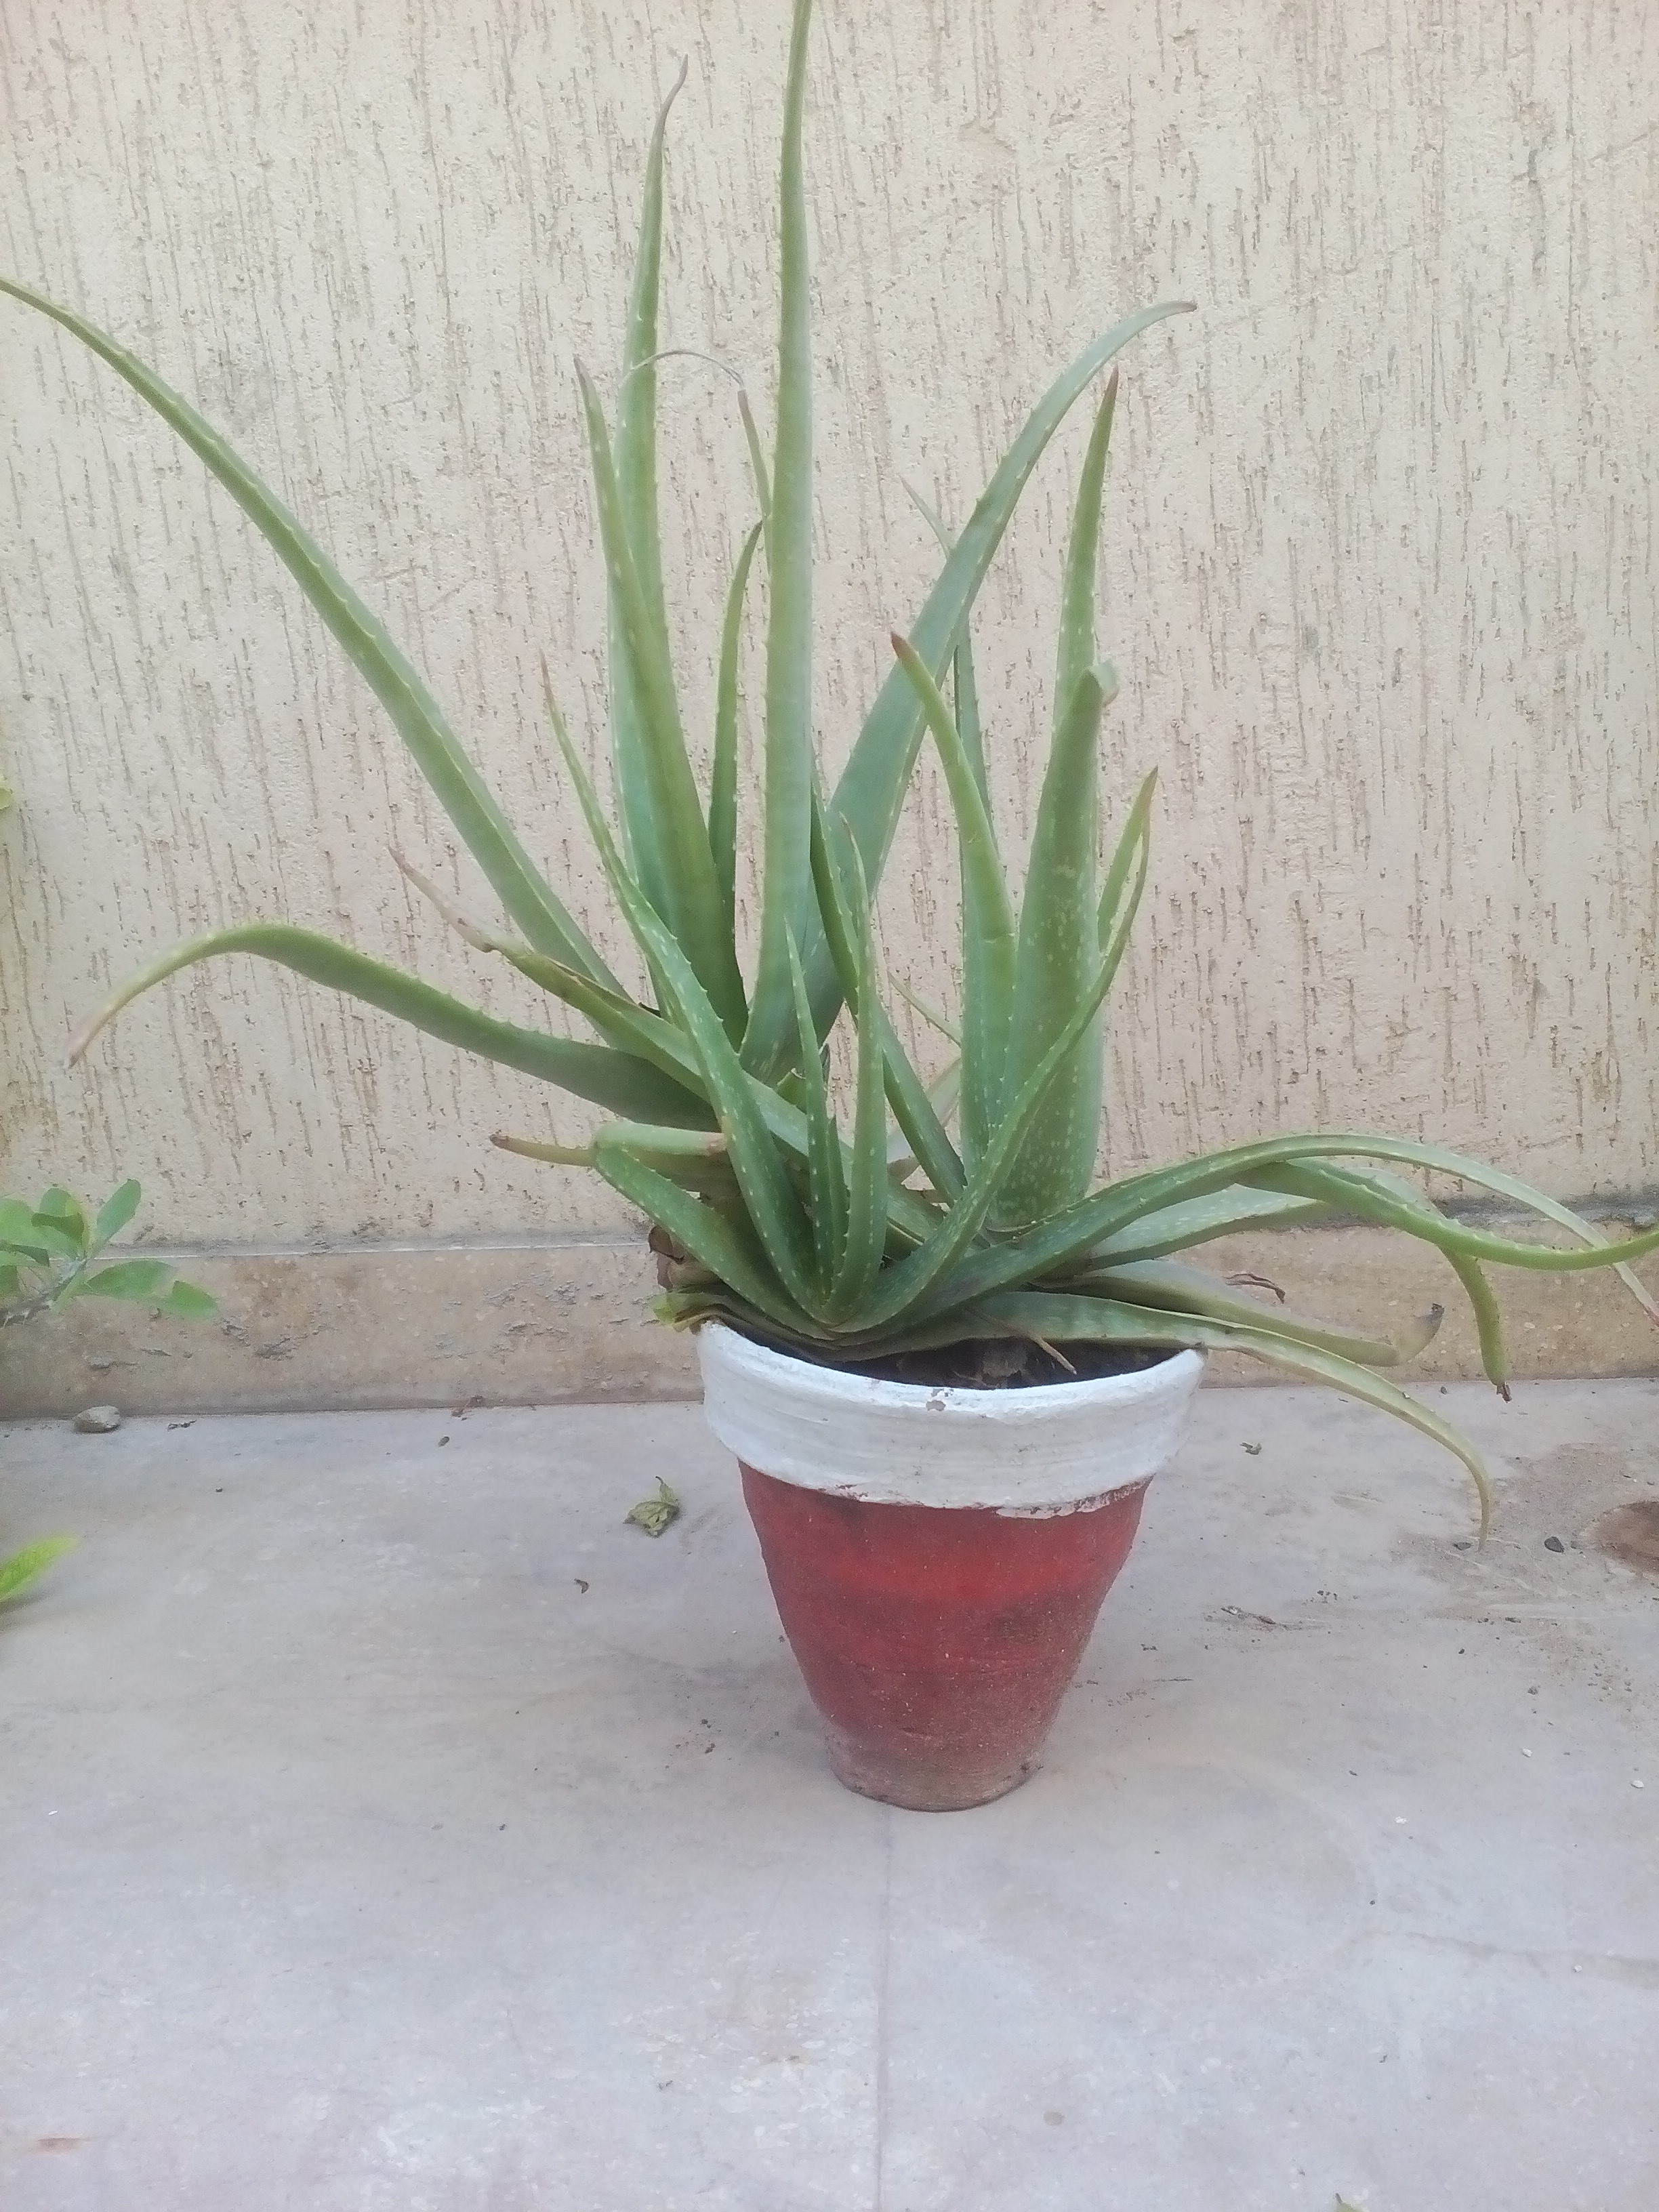
Next step in how to grow Aloe Vera  is the selection of appropriate pot. Aloe Vera doesn’t need much space. If you are planning to grow Aloe Vera in pot or container, make sure it has a hole at bottom for drainage. Put sandy soil it. Dig a 2-3 inch hole in the center and place an offshoot from mother Aloe Vera in it. Fill the hole with soil and place it in sunlight. Just give little water at the time of sowing.

Watering Aloe Vera

Due to its water tolerant capacity and thick waxy leaves, Aloe Vera does not lose water due to evaporation even in hot climate. An Aloe Vera plant in your kitchen garden needs water once in 3-4 weeks. Too much watering will damage the roots. Also water the plant when you see that soil is completely dry after the last watering. Less water should be given in winters.

Harvesting and Care of Aloe Vera

When you see Aloe Vera plant becoming heavy due to its branches, it is fit time to start harvesting the branches. It is a common problem with Aloe Vera that even in a Pot, it grows wildly and become so heavy that it roots appear out of the soil and it starts fall over. It becomes difficult for the soil to hold the plant. So it is better to harvest the branches regularly. As far as fertilizer is concerned, Aloe Vera does not need any kind of synthetic fertilizer, whether you are growing Aloe Vera in kitchen garden, pot or containers.

On commercial scale, mulching and adding farmyard manure/compost is beneficial. If your soil is too much weak and Aloe Vera plant is showing growth at too much less pace, then add farmyard manure/compost only. If you are seeing that the leaves of Aloe Vera are becoming brown, it is a sign of sun burn. Place the pot or container in shade for some days and your Aloe Vera plant will be all fine.

Medicinal Use of Aloe Vera

Medicinal use of Aloe Vera dates back some 6000 years back. That is why, the trend of growing Aloe Vera in urban gardening is increasing. Aloe Vera in your kitchen garden has numerous medicinal benefits. It is very useful against skin burn, itching, cracking and rashes. Aloe Vera is a great source of skin moisturizer. For use on the skin, remove large stem from the main branch and simply squeeze it to get the sap out.

If you have any query, write to me at my Email, Facebook Page or Contact Me page on this website. Your comments will be appreciated. And don’t forget to share it on social media through social buttons below.

Happy Growing 🙂

Cite this Article in APA Style as:

[box type=”note” align=”aligncenter” ]Rahman, M. A. (2017, August 26). How to Grow Aloe Vera in Kitchen Garden? [Blog Post]. Retrieved from http://aridagriculture.com/2017/08/26/how-to-grow-aloe-vera-in-kitchen-garden/[/box]

Save

Save

Save

Categories
Vegetable Gardening

How to Increase Seed Germination in your Kitchen Garden?

Introduction

As the world is witnessing increased urbanization, urban gardening is also getting common, new issues are arising daily related to kitchen or urban gardening, and people want solutions. This is because, kitchen gardening is different from open field practices. In open fields, the behavior of weather parameters is different and they impact the crops differently as compare to backyard gardens or urban garden systems.

Today I am going to write on a common question I am asked on my Facebook page (Arid Agriculture and Kitchen Gardening), through email and queries on my website that how to increase seed germination in kitchen garden? Germination of seed is a complex process. Even if you have top notch and branded store seeds, there are various other factors that hinder optimal germination. This includes the soil health (soil type, fertility, organic matter, pH, drainage etc.), the environmental conditions in your area, the farming practices you are following etc. These issues require a separate article to discuss in depth. The agenda of this article is to guide urban gardening lovers and amateurs with three simple and easy ways that will surely help them in achieving increased seed germination in kitchen garden.

You May Also Like Reading This : How to Grow Turmeric in Kitchen Garden?

How to Increase Seed Germination?

Soaking Seeds

First step in how to increase seed germination is the soaking the seeds before sowing. You can’t believe how a small duration of soaking the seeds in water can increase the germination rate of seeds. Soaking helps in softening the outer coating of the seed thus allowing easy germination. The water enters inside the seed, and elevates the process of germination after it is sown in the soil. Usually when you buy seeds, the information on it suggests soaking them in water. But how many of us follow that instruction? Even if it is not mentioned on the seed pack, water soaking is always beneficial. During winter season, soaked seeds harness more benefits. This is because, soaking seeds in water at room temperature (25oC-30oC) not only soften the coating but optimum temperature treatment is absorbed by the seed. So when you plant it in the soil even in the cold season, the germination rate improves. As far as soaking time is concerned, I recommend at-least two hours of soaking. However, an overnight soaking treatment will definitely increase seed germination in your kitchen garden.

Scarification

Next step in how to increase seed germination is scarification. When I am in a hurry to sow seeds in my kitchen garden, I use the process of scarification. It is a process to damage the outer coat of the seed so that the entry of water get easier that will eventually aid in increase seed germination. For scarification purpose, I use various tools including nail file, sand paper, a triangular file and nail clippers. There are few experts that support using hot water treatment or even acid treatment to the seeds but I am against these. Hot water treatment can cause permanent damage to the germinal hormones of the seeds while acid treatment is harmful for your skin. So my recommendation, do not use these.

Seed Scarification Tools

Now coming back to the tools I mentioned, they are pretty easy to use. For example, in case of sand paper, take two sand papers, and place the seeds between them. Rub the two sheets and your work is done. If there is large size seed, I use triangular file. For this, hold the file in one hand, and rub the seed on one edge. That’s it. Urban gardening is all about experimenting with new things, so you can use knife on your seeds especially the seeds that  are of medium size.

Manure or Compost Application

Being a big proponent of organic farming especially in kitchen gardens, I give a delight of farmyard manure or compost to my vegetable seeds at the time of sowing. If you are sowing in containers, pots or even in a plot of your kitchen garden, mixing manure or compost in the soil increase the germination rate of seeds. What I generally practice is, if I am sowing my vegetables in an open plot of my kitchen garden, I use trowel for plowing the plot and soften the soil. Then I mix the farmyard manure or compost in the soil and sow the vegetable seeds. The reason is that adding manure or compost increases the moisture carrying capacity of soil and makes it easier for the seeds to break their coat. As the coat breaks, they have ready-made nutrients available that help in speeding the germination process. Even the weak ones can show good germination due to nutrients availability.

Trowel for Plowing

There are many other methods of increasing the seed germination in urban gardening system. However the above three are easy to understand and application is swift. An integrated approach of using all three or any two above methods will bring great results. Hope this article has solved the problem of how to increase seed germination in your kitchen garden. If you have another query, write in comments below. Don’t forget to share this article for betterment of everyone.

Happy growing and Cheers 🙂

Cite this Article in APA Style as:

[box type=”note” align=”aligncenter” ]Rahman, M. A. (2017, August 23). How to Increase Seed Germination in your Kitchen Garden?[Blog Post]. Retrieved from http://aridagriculture.com/2017/08/23/how-to-increase-seed-germination-in-your-kitchen-garden/[/box]


Save

Save

Save

Save

Save

Categories
Vegetable Gardening

How to Grow Nutri-Fresh Okra in Kitchen Garden?

Introduction

Are you a green veggie lover like me and maintaining your own kitchen garden? If yes, then I have a brilliant idea for you; why not grow vegetables of your choice in your kitchen backyard. It can save you money and time as well. As going shopping per every veggie craving can cost you lots of time and is exhausting too. Trust me; your own grown fresh veggie is worth tasting as compared to the stale ones we usually get from the market. And this is the sole objective of today’s urban gardening to have economized and fresh food on dining table.

Also Read: 3 Most Healthy Vegetables to Grow in Your Kitchen Garden

So today, I am going to share my experience about how to grow nutri-fresh Okra. Yes your famous Lady Finger, which will be fresh, organic and delicious after cooking. Okra is loved all round the world for its delicious taste, rich Vitamin A content and as an excellent tonic for diet conscious people. So, my recommendation is that, if you have still some inches of dirt left in kitchen garden, grow Okra.

Also Read: Kitchen Gardening for Beginners

Climate for Growing Okra

Considering climate for growing Okra is critical like every other vegetable. However, growing Okra in kitchen garden and urban gardening systems is easy in areas with temperate and tropical climate prevails. Okra can easily be grown in warm humid temperatures; and it sustains from April to October/November in these zones. Frost kills Okra. For urban gardening, it can also be grown in container or pot. However, these should be 14 inch deep for facilitating root growth and should be placed in terrace or garden patch with good sunshine.

Growing Okra in Pots

How to Grow Nutri-Fresh Okra

Soil and Seeds for Okra

It can grow in sandy/loamy soil with pH above 6. Seeds can be saved from the already dried pods from previous harvest of your neighbor or friend or some seed store as per your desire. It is better to choose disease resistant variety. Seeds should be purchased from a certified nursery or online store, ensuring that these are pest and disease free.

Okra Seeds

Cultivating Ground for Okra

Select a patch in your garden which receives at least 6 hours of full day and sun light mix. Seeds can be soaked for few hours in water to aid in germination. Then sowing is done. Seeds should be sown 1/2inch deep and 12 inches apart in soil. Seedlings usually appear in 2-12 days. Leave ample room i.e. 3 feet in between the rows to support the growth as okra can grow up to 6 feet high. It can hinder the growth of other garden plants so chose the garden patch carefully.

Okra Seedlings Appearing from Soil

Strengthening Soil for Okra

Soil amendments can be done in terms of addition of animal manure and mulch for moisture retention. Regular watering (ideally twice a day in extreme summers) and treatment of worms, diseases and weeds is necessary. White yellow flower appear after 6-8 weeks of planting which are followed by okra pods.

Flowering on Okra


Harvesting the Okra

Harvesting the Okra is interesting. Harvest the immature pods 2-3inch long and harvest daily. If left unattended, pods mature and turn tough which are not ideal for cooking but can be used for obtaining seeds for future. Frequent harvesting facilitates pod production. Use scissors or wear gloves for harvesting as spiny pods can irritate the skin.

Ready to Harvest Okra

Enjoy your own grown lady finger by making a curry instantly, preserve it as pickle or share it with the neighbor’s which is in fact the best part. Sharing is caring 🙂

Cite this Article in APA Style as:

[box type=”note” align=”aligncenter” ]Rahman, M. A. (2017, August 19). How to Grow Nutri-Fresh Okra in Kitchen Garden? [Blog Post]. Retrieved from http://aridagriculture.com/2017/08/19/how-to-grow-nutri-fresh-okra-in-kitchen-garden/[/box]


Save

Save

Save

Save

Categories
Vegetable Gardening

3 Most Healthy Vegetables to Grow in Your Kitchen Garden

Introduction

Freshly picked, home grown vegetables are the best source of rich and healthy nutrients; you can have anytime you want. It is always tough to choose what to grow in your kitchen or home garden. But today, i am going to solve this problem by writing on 3 most healthy vegetables that you should give a try in your kitchen garden. I hope this article will help every dirt lover in troubleshooting his/her most important concern. But first, let’s discuss why to choose healthiest vegetables when there are several other options available.

The reason of this article is that all vegetables don’t have equal benefits when you talk about your health. In fact, the element of health is pivotal in choosing what you grow in addition to fulfill your hobby. So it is always wise to grow most healthy vegetables.

Also Read: Kitchen Garden for Beginners

Now, internet is full of articles suggesting which crops are best to be grown in your garden. They give you a mammoth list to choose like top 10 or 20 veggies, however many of these fail to address the specific benefits of each vegetable they suggest. My list of 3 most healthy vegetables to grow in your garden covers these aspects so, that you have full confidence on what you are growing and eating. I always advice my readers, don’t stick in just cultivating your own garden, but also teach your neighbors and others about what you learn here and by your own way of cultivation. This is the best way to serve the community.

Now here is the list 3 most healthiest vegetables to grow in your garden.

1. Spinach

Popeye? Yes I know that’s what comes in your mind in first place. Definitely, spinach has something in it that we had watched Popeye eating spinach and getting balloons in his biceps and forearms. Though I am not preparing you to eat spinach and fight, but yes, spinach adds power to your immune system to fight foreign invaders in your body.

Spinach: 1st Best Veggie to Grow in your Kitchen Garden

Benefits: It provides basic nutrients to bones, hairs and skin. Spinach is also known for improving blood glucose, especially in diabetic patients, pull down the risk of cancer, control and optimize blood pressure and most importantly it aids in curtailing the risk of developing asthma.

What your body gets? 28 micro grams of Vitamin C from 100g serving. It fulfills 34 percent of your daily Vitamin C requirement. It also contains an antioxidant known as Alpha-Lipoic Acid, fibers, Vitamin A and Iron.

Also Read: Five Cheap DIY ways to Kill Home and Kitchen Garden Weeds

2. Broccoli

Sowing and watching these tiny trees growing in my kitchen garden is always a fun for me. However in my childhood, i remember of pushing my plate with Broccoli away from me. Since I learnt what these tiny veggies give to my body, I am using it at least thrice a week now.

Broccoli: 2nd Best Veggie to Grow in your Kitchen Garden

Benefits: Broccoli is a nutrient powerhouse that has lot of healthy calories. Obesity is a global phenomenon that is the root cause of many other diseases. Broccoli is on top of the list to fight obesity. Further, it is helpful against diabetes and heart diseases. Skin complexion is also improved because of certain amino acids present in it.

What your body gets? A cup full of broccoli provides your body with 43 milligrams of Calcium. In addition to this, it also adds 92 micro grams of Vitamin K, fulfilling your 100 percent daily requirement of it. Also it helps in improving digestion system and gives you fresh feeling.

3. Beet Roots

Apart from the delicious taste, it’s the color of the beets that always fascinated me since my childhood. I remember those days, when I used to go to the veggie store with mom and my first choice was always to pick green leafy reddish color beets in the shopping basket. As I grow older, and studied the advantages of eating this God’s gift, I made the routine to add it 3-4 days at least in my meals.

The most common way to use this veggie is in the salads. However, very few of you know that its greenish leaves are more nutritious than the beet root itself.  It is actually a great “two-fer” crop. Roots ad leaves are edible. Young green leaf can be added to the salad, while mature ones are perfect to sauté as a quick and delicious side meal. Red colored beet juice is equally popular in many parts of the world to reduce excess body fat.

Beet Root: 3rd Best Veggie to Grow in your Kitchen Garden

Benefits: The roots of the beets are high in potassium, iron and vitamin C. On the other hand, the greens are superior to roots in terms of nutritional value. These are rich and high in iron, Magnesium, Calcium, Zinc, Potassium, and Vitamins A, B6 and C.

What your body gets? One cup of raw beets (100 grams) delivers about 3 grams of dietary fiber and 60 calories. In addition to this, your body gets 0.01 and 0.06 grams of omega 3 and omega 6 fatty acids respectively. You also get 1.6 grams of protein and 6.8 grams of sugar.

Cite this Article in APA Style as:

[box type=”note” align=”aligncenter” ]Rahman, M. A. (2017, August 18). 3 Most Healthy Vegetables to Grow in Your Kitchen Garden [Blog Post]. Retrieved from http://aridagriculture.com/2017/08/18/vegetables-to-grow-in-kitchen-garden/[/box]


Save

Save

Categories
Vegetable Gardening

Kitchen Gardening For Beginners

“I want to spend a life healthy, full of energy in a natural environment and feeding myself and family with fresh organic food”. This is the statement what I come across regularly whenever I meet my friends, neighbors and students. Well I encourage them that yes environment and healthy food are two basic requirements to spend a joyous life. However, in today’s fast pace urban life, I can’t promise to help them in spending a life in healthy environment but yes, getting fresh, healthy and organic food is in their own hands. How? My reply is simple, grow a kitchen garden in backyard of your home or if you are living in an apartment, use your balcony and equip it with pots to grow your own daily use food items. Believe me, kitchen gardening is easier, safer, free of pesticides and chemicals and most importantly it gives of peace of mind and delicious meals.

The next question I come across with is ‘how much space do I need to exercise kitchen gardening?’ Well kitchen gardening doesn’t mean that it should be carried out right outside of your kitchen door. It can be in a balcony of your apartment, or in garden outside your home. You are in middle of making your delicious meal and you ended up with no green chilies in your fridge? No problem – it’s just steps away.

Balcony Kitchen Garden

Location and Soil

The place where you want to establish your kitchen garden should have access to plenty of sunlight and soil that has good draining capacity. If puddles don’t disappear from soil after a good rain, then your soil is not fit for it. After locating a place with strongest sunshine and good draining soil, my recommendation for kitchen gardening beginners is to start small that is easily manageable to allow you to earn experiment in the first season.

How much Space for Kitchen Garden?

To do a simple garden math, if you are a family of four adults, a kitchen garden measuring 800 square feet is enough to feed you annually. This means, 200 square feet per person a year. More generous climate with healthy soil can even grow more however; you should not forget the goal of your kitchen garden that is to have fresh, healthy and delicious meals of your choice whenever you want. So my recommendation, don’t race behind more production especially if you are a beginner and in first year of your kitchen gardening. Don’t forget that chief driving element to grow kitchen garden for a beginner is to have a garden that tastes good.

Kitchen Gardening in Pots

What to Grow in Kitchen Garden?

After solving the space factor, next is what to grow? Well it is rather easy. You know the taste of you family and their liking. But for beginners, I recommend, don’t go for buying expensive seeds. Start with salads like lettuce or may be green chilies and tomatoes. These are the crops that can easily grow and keep you motivated.

Choosing Crops in Kitchen Garden

Choosing the Healthy Seeds or Transplants

Next thing is choosing a seed or transplant? Well it’s totally up to you. Most of us like to use seeds in a fascination to see juicy baby stems coming out of soil. I don’t want to do a recommendation here. But it’s good to have transplants for kitchen gardening beginners. If you have prior and good experience with seeds in your flowering gardens—go for seeds.

Stay Away from Synthetics

As the stem is out of soil, never ever think of adding any pesticide, herbicide or chemical fertilizer. If you do so, the objective of having a kitchen garden will die immediately. Mulch, Mulch and Mulch, that’s the only option for you keep your meals organic. Grass clippings, straw, shredded leaves, pine needles, dead weeds that haven’t gone to seed good source of mulch. Farm yard dung from livestock can also be a good source of organic fertilizer.

Mulching Kitchen Garden

Don’t Die Your Plants of Thirst

Watering the garden is your chief responsibility. Vegetables and fruits are made of water. So they drink a lot of water. Water your kitchen garden as much as they need. Again–draining of soil matters a lot here. If your soil has poor drainage, then you have to be more careful.

Production in Kitchen Garden

Safeguard Your Efforts

Last but not the least; keep an eye on your kitchen garden. Harvest your crop timely or someone else does so. These ‘someone’ may be bacteria and insects as you are growing organic so they have greater opportunity to get their share. And if you ‘someone’ in your kitchen garden includes four legged animals like rabbit or deer, fencing your garden is the best option. If you are growing your kitchen garden in pots, you can use mesh to eradicate any chance damage.

Safeguarding Kitchen Garden

Cite this Article in APA Style as:

Save

Save